Blog - Blush Beauty Bar

Brow Lamination Q&A

October 17, 2024 in Eyebrows

Brow lamination has become a popular beauty treatment, offering beautifully styled brows with a fuller appearance. Whether you’re considering this treatment for the first time or just curious about the buzz surrounding it, we’ve got you covered!

Eyebrows

Understanding Brow Lamination

Brow lamination is essentially a perm for your eyebrows, designed to give them a more polished and fuller look. It involves a chemical solution that restructures the brow hairs, making them easier to manipulate and style. Many people appreciate brow lamination for its ability to tame unruly brows, creating a more uniform shape and appearance. But what does this mean for you?

How Does the Process Work?

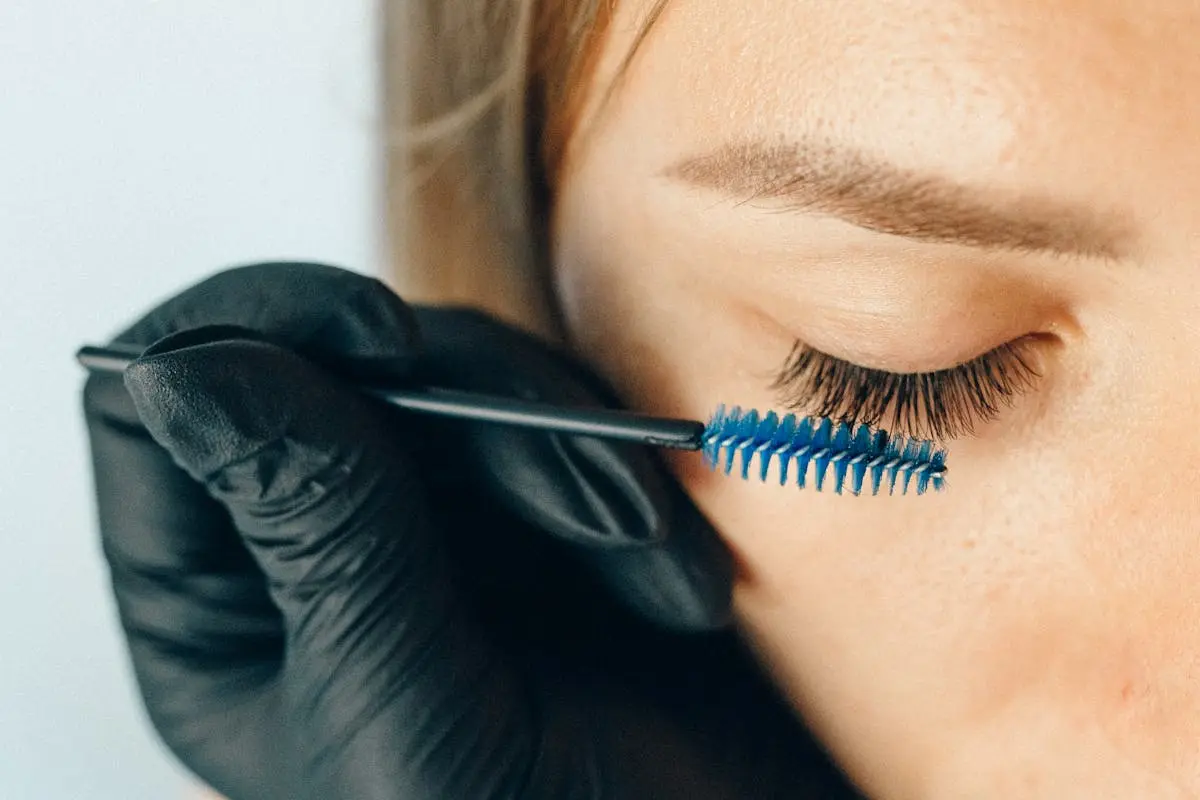
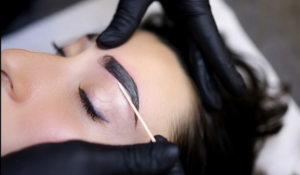
The process of brow lamination is relatively straightforward, typically taking around 30 to 45 minutes. Initially, a professional will cleanse your brow area to remove any makeup or oils, creating an optimal canvas for the treatment. Following this cleansing, a setting solution is applied to the brow hairs to soften them. This is where the magic happens; the technician can then brush your brows into your preferred shape, whether that’s smooth and sleek or softly feathered.

Once your eyebrows are styled to perfection, a fixing solution is applied to hold that shape for the long term. This dual-step process ensures that your brows stay exactly how you want them for several weeks. After the treatment concludes, most professionals recommend not wetting your brows for at least 24 hours, allowing the solutions to fully set and adhere to the hairs.

Is It Safe for Everyone?

Safety is always a top concern when considering any beauty treatment, and brow lamination is no exception. In general, brow lamination is considered safe for most individuals. However, certain factors might influence whether it’s suitable for you. For instance, if you have sensitive skin, allergies, or specific skin conditions, it’s crucial to have a consultation with your beauty professional beforehand. They can assess your specific situation and advise accordingly.

Common Concerns and Misconceptions

Like any beauty trend, brow lamination comes with its fair share of myths and misconceptions. One common concern is that the treatment can damage your natural brow hairs. In reality, when done by a trained professional using high-quality products, brow lamination should not harm your brows.

Another misconception is that brow lamination results in a rigid, plastic-like appearance. However, with proper technique, the result can be soft, natural, and incredibly flattering. It’s all about communication with your technician; expressing your desired outcome can help achieve a look that feels authentic and suits your unique style!

Lash Extensions or Lash Lift?

September 25, 2024 in Lashes

When it comes to enhancing your natural lashes, the dilemma often lies between choosing lash extensions or opting for a lash lift. Both options promise to elevate your beauty game, but which one is right for you?

Woman With Black Hair Brush

Understanding Lash Extensions

Lash extensions are a popular choice among beauty enthusiasts looking for dramatic results. These synthetic or mink fibers are attached to your natural lashes, creating a fuller and longer appearance. The process of applying lash extensions can be time-consuming, often taking up to two hours, but the effects are immediately noticeable. Clients walk away with lashes that have a wow factor, making their eyes pop in a way that mascara simply can’t achieve.

With the variety of styles available, the client and artist can fully customize their look—from natural and subtle to voluminous and bold. Lash extensions come in various lengths, thicknesses, and curls, so you can truly create a personalized look that showcases your personality.

Lash Extension Application

The technician will isolate each natural lash, applying the extension one by one with precision using a special adhesive. This meticulous approach is necessary to ensure that each extension is securely attached without causing damage. The entire experience, while lengthy, can be quite relaxing, as many clients enjoy the pampering aspect of the service.

Lash Extension Maintenance

Lash extensions require regular fills every 2 to 4 weeks to maintain their fullness, as your natural lashes shed and, in turn, affect the look of the extensions. It is also important to note specific products to avoid such as cotton pads and oil-based removers, which can dissolve the adhesive.

Lash Extension Cost

A full set of lash extensions typically ranges from (100-)200 with fills ranging from (40-)75.

The Benefits of Lash Lifts

Lash lifts have gained popularity for a more natural approach to enhancing lashes. Unlike extensions, a lash lift enhances your natural lashes by curling them and making them appear longer without the addition of artificial materials. The process involves the use of a chemical solution to reshape the lash, lifting them from the base for a lasting effect, usually for 6 to 8 weeks requiring minimal maintenance!

Lash Lift Application

The lash lift procedure is typically quicker, usually lasting around 45 minutes to an hour. Rather than adhering individual fibers, the technician applies a lifting solution to the natural lashes, often using silicone pads to set the desired curl. This treatment is less involved, making it a great option for those pressed for time or those wanting a hassle-free beauty regimen.

Lash Lift Maintenance

Lash lifts provide a longer-lasting result without the need for constant touch-ups. While the lift itself lasts about 6 to 8 weeks, you will still need to be gentle with your lashes, avoiding heavy eye makeup and oils!

Lash Lift Cost

A lash lift typically ranges from (75-)100.

Choosing the Right Option for You

Choosing between lash extensions and a lash lift ultimately hinges on your personal preferences and lifestyle. If you are someone who loves a bold, glamorous look and doesn’t mind the commitment involved in maintenance appointments, lash extensions may be your go-to.

On the other hand, if you lean towards a more natural appearance and want a low-maintenance beauty routine, a lash lift could be the perfect match. This option enhances your natural lashes and offers a fresh, awake look without the hassle of frequent visits to the salon!

Botox FAQs

August 29, 2024 in Uncategorized

Botox has become a popular cosmetic treatment, but many people still have questions about it. This FAQ guide aims to answer some of the most common queries about Botox, including its uses, safety, and what to expect during the procedure, so let’s dive in!

Woman Getting a Face Botox

What is Botox?

Botox, short for botulinum toxin, is a naturally occurring protein that is utilized in various medical and aesthetic treatments. It functions by temporarily paralyzing specific muscles, which can reduce the appearance of fine lines and wrinkles.

In addition to its cosmetic uses, Botox can also treat medical conditions such as chronic migraines, excessive sweating, and TMJ.

How does Botox work?

Essentially, the botulinum toxin interrupts the communication between the nerve endings and the muscles. By doing so, it minimizes muscle movement, which is often the culprit behind the formation of fine lines and wrinkles.

As a result, someone who receives Botox can enjoy a noticeable reduction in muscular activity for several months.

Is Botox safe?

Botox is generally considered safe when administered by a qualified professional. Extensive research has shown that Botox is effective for both its aesthetic and medical uses with a high level of safety. However, like any medical treatment, there are potential side effects.

Common side effects may include minor swelling, bruising, or redness at the injection sites. These effects typically subside within a few days. In rare cases, more serious side effects such as muscle weakness or difficulty breathing can occur, underscoring the importance of receiving treatment from licenced practitioners.

Ultimately, discussing your medical history and any concerns with your provider before undergoing Botox treatment can help ensure a safe experience!

What should I expect during a Botox treatment?

During a Botox treatment, you can expect a straightforward and minimally invasive procedure. Typically, a licensed injector will start by assessing the areas you wish to treat and discussing your concerns.

Once you and your provider agree on the areas to be treated, the injector will use a very fine needle to administer the Botox into targeted muscles. Most patients report feeling just a slight pinch during the injection, and the entire process usually takes only about 10 to 15 minutes.

How long does Botox last?

The effects of Botox typically last between three to six months, depending on various factors such as individual metabolism and the area treated. Many people find that the results gradually fade as muscle movement returns.

In practice, some individuals may notice that with regular Botox treatments, they require less frequent sessions over time. This can be attributed to the muscles becoming conditioned to the reduced activity.

Gel X Nail Extensions- Q&A

July 31, 2024 in Nails

What are Gel X Nail Extensions?

Gel X Nail Extensions are a revolutionary nail enhancement method that combines the flexibility of gel polish with the strength of traditional nail enhancements. They are applied using soft gel tips that are pre-shaped to fit the nail, making the process quick and efficient.

Unlike acrylics, Gel X extensions are odorless and do not require any monomer or harsh chemicals, making them a healthier option for your nails. These extensions provide a lightweight feel while still offering durability and a natural look.

With Gel X Nail Extensions, you can achieve the desired length and shape without damaging your natural nails. The flexibility of the gel allows for comfortable wear, and the removal process is gentle, ensuring the health of your nails.

Whether you prefer a classic French tip or a trendy ombre design, Gel X Nail Extensions offer endless possibilities for customization, making them a popular choice among nail enthusiasts looking for a long-lasting and beautiful manicure.

The Gel X Nail Extension process involves using a specially formulated gel that is cured under an LED or UV lamp, ensuring a strong bond and a glossy finish. These extensions can last up to three weeks or more with proper care, giving you a stunning manicure that stands the test of time.

How are Gel X Nail Extensions Applied?

The application of Gel X Nail Extensions begins with prepping the natural nails by gently buffing the surface and applying a pH balancing agent to ensure proper adhesion.

Next, the soft gel tips are selected to fit each nail perfectly, and the gel is applied to the tip to create the desired length and shape. The extensions are then cured under a lamp to secure them in place.

After the extensions are cured, the technician will trim and shape them to your preference before finishing with a gel polish of your choice. The final step involves curing the polish for a flawless, long-lasting finish.

The entire application process usually takes between 1 to 2 hours, depending on the complexity of the design and the number of extensions required. The result is a stunning set of nails that look and feel natural while being strong and durable.

Whether you opt for a simple nude look or a glamorous statement design, Gel X Nail Extensions offer a versatile and customizable option for anyone looking to enhance their manicure game with ease.

The beauty of Gel X Nail Extensions lies not only in their aesthetics but also in the fact that they require minimal maintenance and upkeep. With proper care and regular visits to your nail technician for fills or replacements, you can enjoy beautiful nails without the hassle.

Are Gel X Nail Extensions Safe for Natural Nails?

Yes, Gel X Nail Extensions are considered safe for natural nails when applied and removed by a trained and experienced nail technician. The technique used in Gel X extensions minimizes the risk of damage to the natural nail bed if done correctly.

It is essential to follow proper aftercare guidelines, such as avoiding excessive exposure to water and using cuticle oil regularly to keep the nails and surrounding skin moisturized. This helps maintain the health and strength of your natural nails.

If you ever experience any discomfort or notice changes in your natural nails while wearing Gel X extensions, it is best to consult your nail technician for advice. They can assess the situation and recommend the appropriate steps to ensure the health of your nails.

By choosing a reputable salon or nail professional for your Gel X Nail Extensions, you can enjoy beautiful, long-lasting nails without compromising the health of your natural nails. Regular maintenance and following best practices will help you keep your nails strong and healthy.

With proper application, maintenance, and care, Gel X Nail Extensions can be a safe and attractive option for anyone looking to enhance their nails with a sophisticated and durable manicure. Embrace the beauty of Gel X extensions while keeping your natural nails healthy and strong.

How to Maintain Gel X Nail Extensions?

Maintaining Gel X Nail Extensions is relatively easy with a few simple steps to follow. Firstly, it is essential to keep your nails dry and avoid prolonged exposure to water, as this can weaken the bond between the extensions and your natural nails.

Using gloves while doing chores that involve water or harsh chemicals can help protect your manicure and prolong its lifespan. Additionally, applying cuticle oil regularly keeps the nails hydrated and prevents them from becoming brittle or dry.

Avoid using your nails as tools to prevent accidental damage or lifting of the extensions. If a nail becomes loose or damaged, it is best to visit your nail technician for a repair to ensure that your manicure stays intact and beautiful.

Regular visits to your nail technician for maintenance, such as fills or replacements, are crucial for keeping your Gel X Nail Extensions looking fresh and fabulous. These appointments allow for any necessary repairs or adjustments to be made, preserving the integrity of your manicure.

By following these simple maintenance tips and taking good care of your Gel X Nail Extensions, you can enjoy a long-lasting and flawless manicure that enhances your overall look. Treat your nails with care, and they will reward you with beauty and strength.

Keep Your Hair Color Vibrant Between Salon Visits- Tips and Tricks

July 29, 2024 in Hair Tips and Tricks

Are you tired of your hair color fading fast after leaving the salon? Fear not! We’ve got you covered with some fantastic tips and tricks to help you maintain that vibrant hair color between your salon visits. Say goodbye to dull, lifeless hair, and hello to long-lasting, gorgeous color that stays true to you!
Grey Hair Blower Near Pink Hair Combs and Scrunchies

Understanding Your Hair Type

Before diving into the world of hair colors, it’s crucial to understand your hair type. Different hair types react differently to coloring treatments, so knowing whether you have oily, dry, curly, or straight hair can help you choose the right products and methods to maintain your color. Consult with your hairstylist to determine your hair type if you are unsure, as this knowledge will be the foundation for keeping your hair color vibrant.

Knowing your hair’s porosity is also essential, as this determines how well your hair holds onto color. High porosity hair tends to lose color faster, while low porosity may struggle to absorb the color. Understanding these factors will guide you in selecting the right products and treatments to maintain your vibrant hair color for longer.

Furthermore, consider any previous chemical treatments your hair has undergone, as this can impact how your hair reacts to coloring agents. Armed with this knowledge, you can make informed decisions about the best techniques and products to preserve your hair color’s vibrancy between salon visits.

The Importance of Quality Hair Care Products

Investing in quality hair care products specially formulated for color-treated hair is non-negotiable when it comes to maintaining vibrant hair color. Look for shampoos and conditioners that are sulfate-free to prevent color stripping and fading. These products will help lock in moisture, protect your color, and keep your hair looking luscious and healthy.

In addition to sulfate-free products, using a UV-protectant spray or serum is crucial to shield your hair from the sun’s harmful rays, which can cause color fading and damage. Incorporating a weekly deep conditioning treatment can also work wonders in nourishing your hair and preserving your color’s longevity. By investing in quality hair care products, you can ensure that your vibrant hair color remains a head-turning statement.

Remember, your hair is an investment, and using the right products tailored to your color-treated hair will not only maintain your hair’s vibrancy but also keep it healthy and strong. Say goodbye to dull hair days and hello to radiant, long-lasting color with the power of quality hair care products.

Simple Daily Hair Care Routine

Establishing a simple yet effective daily hair care routine is key to preserving your hair color’s vibrancy between salon visits. Start by washing your hair with lukewarm or cool water, as hot water can strip away the color and natural oils from your hair. Use a color-safe shampoo and conditioner, gently massaging it into your hair and scalp to cleanse and hydrate without compromising your color.

After washing, avoid vigorously towel-drying your hair, as this can cause breakage and color fading. Instead, gently squeeze out excess water and allow your hair to air dry or use a hair dryer on a cool setting. Incorporate leave-in treatments or serums to protect your hair from heat styling and environmental stressors, ensuring your color remains vibrant and fresh throughout the day.

Don’t forget to brush your hair with a wide-tooth comb to prevent tangles and breakage, especially if your hair is prone to tangling. By following a simple daily hair care routine tailored to your color-treated hair, you can maintain that salon-fresh color and shine between appointments.

Protecting Your Hair Color from UV Damage

UV rays can be the enemy of vibrant hair color, causing it to fade and lose its luster over time. To combat UV damage, consider wearing a hat or scarf when exposed to direct sunlight for extended periods. This simple yet effective step can shield your hair from harsh UV rays and preserve your color’s brilliance.

Using UV-protectant hair products, such as sprays or leave-in conditioners with SPF, can also provide an additional layer of defense against UV damage. These products create a barrier between your hair and the sun, preventing color fading and helping your hair maintain its radiant hue. By being proactive in protecting your hair from UV damage, you can enjoy long-lasting, vibrant color without compromise.

DIY Hair Color Enhancing Treatments

Boosting your hair color between salon visits can be as easy as raiding your kitchen for natural ingredients that enhance and revive your color. DIY treatments like vinegar rinses for shine, avocado masks for hydration, and tea rinses for enhancing dark tones can work wonders in keeping your color fresh and vibrant.

Experimenting with henna or semi-permanent hair dyes can also be a fun way to add depth and richness to your existing color without the commitment of a permanent change. These DIY color-enhancing treatments are not only gentle on your hair but also help maintain your color’s vibrancy in between professional color sessions.

Remember to always do a patch test before trying any DIY treatments and consult with your hairstylist if you have any concerns about how certain ingredients may interact with your current color. By incorporating these simple DIY treatments into your hair care routine, you can keep your hair color looking fresh, vibrant, and full of life.

Lip Flip or Lip Filler? Which is Best for You?

July 11, 2024 in Botox/Filler

Looking to enhance your lips but unsure about the best option? Dive into the world of lip enhancements with our guide on lip flips and lip fillers to discover which one suits you best.

Differences Between Lip Flip and Lip Filler

Lip flip and lip filler are both popular cosmetic procedures for achieving fuller lips. Lip flip involves injecting Botox along the upper lip to relax muscles and roll out the lip, creating a fuller appearance. On the other hand, lip fillers use hyaluronic acid to add volume to the lips, enhancing their shape and size.

While lip flip provides a subtle enhancement by exposing more of the upper lip, lip filler offers more dramatic results by physically increasing lip volume. The choice between the two procedures depends on your desired lip shape and the level of fullness you wish to achieve.

If you’re looking for a temporary solution with subtle changes, a lip flip might be the ideal choice. In contrast, lip fillers offer longer-lasting results with the ability to customize the shape and size of your lips to a greater extent.

Benefits of Lip Flip

One of the key benefits of a lip flip is its ability to enhance the natural shape of your lips without adding volume. Lip flips are also known for providing a subtle and natural-looking lift to the upper lip, creating a more defined smile.

Another advantage of lip flips is their temporary nature, allowing you to test out the look and see if it suits you before committing to a more permanent solution. This procedure is quick, minimally invasive, and requires little to no downtime for recovery.

Lip flips are great for individuals who are looking to enhance their lips subtly or are hesitant about committing to a long-term change. The results typically last for a few months, making it a flexible option for those exploring lip enhancements for the first time.

Benefits of Lip Filler

If you desire more significant changes to the size and shape of your lips, lip fillers offer a versatile solution. Lip fillers can address volume loss, asymmetry, and create a plumper appearance, catering to various aesthetic goals.

Lip fillers allow for precise customization, enabling you and your provider to tailor the treatment to achieve your desired lip fullness and contour. They also offer long-lasting results, with effects typically lasting several months to over a year based on the type of filler used.

Unlike a lip flip, which focuses on the upper lip, lip fillers can enhance both the upper and lower lips, creating a harmonious and balanced look. The procedure is versatile, and the results can be adjusted based on your preferences for lip volume and definition.

Choosing the Right Procedure for You

Deciding between a lip flip and lip filler depends on your aesthetic goals, desired lip fullness, and the level of permanence you prefer. Consider a lip flip if you are looking for subtle enhancements that offer temporary changes and a natural-looking lift to the upper lip.

On the other hand, opt for lip fillers if you seek more pronounced alterations, long-lasting results, and the flexibility to customize the shape and volume of both your upper and lower lips. Discuss your preferences with a qualified professional to determine the best option for your lip enhancement journey.

Choosing Your Perfect Lip Enhancement

Ready to achieve the perfect pout with lip enhancements? Consult with our experts to decide between a lip flip and lip filler and take the first step towards your ideal look.

7 Insider Tricks for Long-Lasting Makeup from a Traveling Makeup Artist

June 26, 2024 in Uncategorized

Join me on a beauty journey as I reveal 7 insider tricks for achieving makeup perfection that lasts all day and night. Whether you’re a makeup enthusiast or a beginner, these expert tips will elevate your makeup game and keep you looking flawless wherever your travels take you.
Faceless women applying multicolored eyeshadows on wrist for testing

1. The Art of Makeup Setting Spray Magic

Makeup setting spray is a must-have in any makeup bag, but do you know the secret to maximizing its potential? After applying your makeup, hold the setting spray at arm’s length and spritz lightly in an ‘X’ and ’T’ motion. This technique ensures even distribution and sets your makeup in place for hours.

For a refreshing twist, try storing your setting spray in the fridge. The cool mist not only sets your makeup but also gives your skin a rejuvenating boost, perfect for long days on the road or under the sun.

Remember, setting spray is your makeup’s best friend when it comes to longevity. Invest in a quality setting spray and watch your makeup stay flawless from morning coffee to evening cocktails.

2. Glow like a Pro with Illuminating Primers

Illuminating primers are the secret weapon for that coveted lit-from-within glow. Apply a pea-sized amount before foundation to create a luminous base that shines through your makeup.

To highlight specific areas like your cheekbones or brow bones, mix a drop of liquid illuminator with your primer. This trick adds an extra dimension to your makeup look, giving you a professional, radiant finish.

With illuminating primers, you’ll be glowing like a pro in no time. Say goodbye to dull, flat skin and hello to a dewy, radiant complexion that lasts all day.

3. Mastering the Flawless Foundation Technique

Achieving a flawless foundation finish is all about the right tools and technique. Invest in a quality foundation brush or makeup sponge for seamless application that blends your foundation into your skin effortlessly.

For a natural look, apply foundation in thin layers, focusing on areas that need more coverage. Build up gradually to avoid a cakey finish and set with a light dusting of translucent powder for a long-lasting, matte effect.

With the right foundation technique, you’ll have a flawless base that enhances your natural beauty and withstands the challenges of travel, keeping you fresh and radiant throughout the day.

4. Concealer Hacks for Bright and Awake Eyes

Concealer is a makeup multitasker that can brighten dark circles, conceal blemishes, and highlight features. To achieve bright and awake eyes, apply concealer in an inverted triangle under your eyes, blending outwards for a seamless finish.

For stubborn dark circles, mix a peach or orange corrector with your concealer to neutralize discoloration before applying your regular concealer. This color-correcting trick cancels out dark shadows and brightens your under-eye area instantly.

By mastering these concealer hacks, you’ll have bright, refreshed eyes that look like you’ve had a full night’s sleep, even after a red-eye flight or late-night exploring.

5. Blush and Bronzer Tricks for a Natural Flush

Blush and bronzer can add warmth and dimension to your face, but do you know the secrets to a natural flush that lasts all day? Choose blush and bronzer shades that complement your skin tone and apply with a light hand for a subtle, natural look.

To create a sun-kissed glow, apply bronzer to the high points of your face where the sun naturally hits. Remember to blend well to avoid harsh lines and ensure a seamless transition between your blush and bronzer.

With these blush and bronzer tricks, you’ll achieve a natural, healthy flush that enhances your features and stays put whether you’re exploring a new city or lounging on the beach.

6. Eyeshadow Secrets to Elevate Your Look

Elevate your eye makeup game with these eyeshadow secrets from a traveling makeup artist. Start by applying an eyeshadow primer to create a smooth canvas that intensifies the colors and extends the wear of your eyeshadow.

When blending multiple eyeshadow shades, use a light hand and build up the colors gradually for a seamless gradient effect. Focus darker shades on the outer corner and crease to add depth and definition to your eyes.

By mastering these eyeshadow secrets, you’ll create mesmerizing eye looks that stay vibrant and crease-free from sunrise to sunset, no matter where your journey takes you.

7. Lipstick Longevity Tips for All-Day Wear

Make your lipstick last all day with these insider tips. Start by exfoliating your lips to create a smooth base, then outline and fill in your lips with a lip liner to prevent feathering and prolong the wear of your lipstick.

Choose long-wearing lipstick formulas or layer with a liquid lipstick for extended stay power. Blot with a tissue between layers to lock in the color and finish with a touch of translucent powder for a matte, long-lasting look.

With these lipstick longevity tips, you’ll enjoy vibrant, kiss-proof lips that defy fading, smudging, and feathering, ensuring your pout looks perfect throughout your travel adventures.

7 Tips for Choosing the Perfect Wedding Makeup Artist

June 17, 2024 in Makeup Tips and Tricks

Your wedding day is one of the most important days of your life, and you deserve to look and feel absolutely stunning. Choosing the perfect wedding makeup artist is a crucial decision that can make or break your bridal look. Here are 7 valuable tips to help you select the ideal makeup artist who will bring your vision to life and make you feel like the most beautiful bride on your special day.

1. The Art of Bridal Makeup

Bridal makeup is an art form that requires skill and creativity to enhance your features and complement your wedding dress. A talented wedding makeup artist will understand the nuances of bridal makeup, from creating a flawless base that lasts all day to choosing the right colors that photograph beautifully. They will work to highlight your best features while making you feel like the best version of yourself on your special day.

The key to perfect bridal makeup is balance. A skilled makeup artist knows how to strike the right balance between accentuating your eyes, lips, and cheeks without overpowering your natural beauty. They will listen to your preferences and work with you to create a customized look that reflects your personality and style while ensuring you look dazzling in person and in photos.

When choosing a wedding makeup artist, look for someone who specializes in bridal makeup and has a portfolio that showcases their talent and versatility. Don’t hesitate to schedule a trial to test their skills and ensure they understand your vision for your wedding day look.

2. Finding Your Signature Look

Every bride is unique, and your wedding makeup should reflect your individual style and personality. Whether you prefer a natural, barely-there look or a glamorous, full-glam finish, your makeup artist should be able to bring your vision to life with precision and skill.

Communicate openly with your makeup artist about your preferences, show them inspiration photos, and be clear about what you like and don’t like. A great makeup artist will listen to your feedback and make adjustments to ensure you are completely satisfied with your bridal look.

3. Decoding Makeup Artist Portfolios

When browsing through makeup artist portfolios, pay attention to the diversity of their work. Look for artists who have experience working with various skin tones, textures, and styles to ensure they can cater to your unique needs.

Check for consistency in their portfolio. A reliable makeup artist will have a cohesive style that shines through in all their work, from natural and soft looks to bold and dramatic styles. This consistency is a sign of professionalism and expertise in the field.

Don’t hesitate to ask for references or read reviews from previous clients to get a sense of the artist’s reputation and customer satisfaction. A great makeup artist will have a strong portfolio and a track record of happy brides who felt beautiful and confident on their wedding day.

4. Trials and Test-Runs

Scheduling a makeup trial before your wedding day is essential to ensure you and your makeup artist are on the same page. Use this time to test different looks, experiment with colors and techniques, and finalize the perfect bridal look that you love.

During the trial, pay attention to the products used, the longevity of the makeup, and how it feels on your skin. Provide honest feedback to your artist so they can make any necessary tweaks before the big day. A trial run will give you peace of mind and confidence in your chosen makeup artist.

5. Budgeting for Beauty

When budgeting for your wedding makeup artist, consider the value of professional artistry in creating a flawless and long-lasting bridal look. While it’s important to stay within your budget, remember that quality makeup and skillful application are investments in your wedding day memories.

Explore different packages and services offered by makeup artists to find one that fits your budget and needs. Some artists may include additional services like touch-up kits, false lash application, or on-site touch-ups for an extra fee. Prioritize what is important to you and allocate your budget accordingly.

6. On-Trend vs. Timeless Makeup

When choosing your wedding makeup look, consider whether you prefer an on-trend style that reflects the latest beauty trends or a timeless, classic look that will stand the test of time. Your makeup artist can help guide you in selecting a style that complements your dress, theme, and personal taste.

Opting for a timeless makeup look ensures that you will love your bridal photos for years to come, while a trendy look can add a modern twist to your wedding day style. Work with your makeup artist to strike the perfect balance between current trends and timeless elegance.

7. Communication is Key

Open and clear communication with your wedding makeup artist is essential for achieving the perfect bridal look. Share your ideas, inspirations, and concerns with your artist to ensure they understand your vision and can bring it to life.

Don’t be afraid to speak up if you want changes or adjustments during the makeup application process. Your makeup artist wants you to feel beautiful and confident, so honesty and communication are vital in achieving the ideal bridal look that makes you feel like the best version of yourself.

Building a rapport with your makeup artist will help create a comfortable and enjoyable experience on your wedding day. Trust their expertise and experience, but also feel empowered to voice your preferences and desires to ensure you walk down the aisle feeling radiant and gorgeous.

The Benefits of Vitamin E for Your Skin and Hair

June 5, 2024 in Hair Tips and Tricks

What is Vitamin E and why is it beneficial for skin and hair?

Vitamin E is a powerful antioxidant that helps protect your skin and hair from damage caused by free radicals such as pollution and UV rays. It also has anti-inflammatory properties that can calm irritated skin and promote healing. When used on the skin, Vitamin E can help moisturize, reduce the appearance of scars, and improve overall skin health. For your hair, Vitamin E can nourish and condition strands, promote hair growth, and add shine. Including Vitamin E in your skincare and haircare routine can lead to healthier-looking skin and hair.

Woman Wearing Black Spaghetti Strap Top

The role of Vitamin E in promoting skin health

Vitamin E plays a crucial role in promoting skin health by acting as an antioxidant that helps protect your skin from damage caused by free radicals like UV rays and pollution. This vitamin also aids in maintaining your skin’s natural moisture barrier, which can help prevent dryness and premature aging. Additionally, Vitamin E has anti-inflammatory properties that can help soothe irritated skin and reduce redness. Including Vitamin E in your skincare routine can contribute to a healthier complexion and a more radiant appearance.

Advantages of Vitamin E for hair care

Vitamin E is essential for hair health, promoting growth and strength. It helps in repairing damaged hair follicles and preventing breakage. Regular use of Vitamin E can make your hair shinier and smoother. Adding Vitamin E oil to your hair care routine can nourish your scalp and improve blood circulation, leading to healthier hair growth.

How to include Vitamin E in your skincare routine

Vitamin E can be applied topically by using skincare products that contain this beneficial nutrient. Look for products like moisturizers, serums, or creams that list Vitamin E as an ingredient. You can also opt for pure Vitamin E oil or capsules to apply directly to your skin. Additionally, incorporating foods rich in Vitamin E, such as nuts, seeds, avocado, and spinach, into your diet can also boost your skin’s health from the inside out.

DIY Vitamin E treatments for healthy skin and hair

You can easily create DIY vitamin E treatments at home to promote healthy skin and hair. Mix a few drops of vitamin E oil with your regular moisturizer or add it to your hair conditioner for added nourishment. Create a simple face mask by mixing vitamin E oil with honey and applying it to your face for 15-20 minutes before rinsing off. For a deep conditioning hair mask, mix vitamin E oil with coconut oil and apply it to your hair, leaving it on for 30 minutes before washing it out. Incorporating these treatments into your beauty routine can help improve the overall health and appearance of your skin and hair.

Choosing the right Vitamin E products for skin and hair

When selecting Vitamin E products for your skin and hair, it’s essential to consider the form of Vitamin E in the product. Look for products containing tocopheryl acetate or tocopherol as these are most effective for skin and hair. Consider serums, creams, or oils for direct application to the skin. Hair masks or shampoos with Vitamin E are beneficial for hair health. Check product labels for ingredients and choose products with natural or organic components for best results.

Vitamin E-rich foods for internal health and external beauty

Vitamin E can be found in various foods like almonds, sunflower seeds, spinach, and avocados. Including these foods in your diet can help improve your skin and hair health. Vitamin E is known for its antioxidant properties that can protect your skin from damage and keep it looking healthy. Additionally, it promotes hair growth and can help with scalp conditions like dandruff. Adding Vitamin E-rich foods to your diet can enhance your internal health and contribute to your external beauty.

Combining Vitamin E with other skincare ingredients for best results

To get the best results for your skin and hair, try pairing Vitamin E with other skincare ingredients. Vitamin C can enhance the effectiveness of Vitamin E, boosting your skin’s protection from sun damage. Hyaluronic acid can further moisturize and plump your skin when combined with Vitamin E. Retinol, known for its anti-aging benefits, can work synergistically with Vitamin E to improve skin texture and reduce wrinkles. Lastly, niacinamide can help Vitamin E in protecting your skin barrier and reducing inflammation. By combining Vitamin E with these ingredients, you can maximize the benefits for your skin and hair health.

Understanding the potential side effects of Vitamin E usage

Before incorporating Vitamin E into your skincare routine, it’s important to be aware of potential side effects. While Vitamin E is generally safe for most people, excessive use can lead to skin irritation, allergic reactions, and in some cases, worsen acne. To avoid adverse effects, it’s recommended to do a patch test before using Vitamin E products and consult with a dermatologist if you have sensitive skin or pre-existing skin conditions.

Conclusion: Embracing the benefits of Vitamin E for glowing skin and luscious hair

In conclusion, Vitamin E is a fantastic ally for achieving radiant skin and healthy hair. Applying Vitamin E oil can help nourish and protect your skin from damage caused by free radicals. It also promotes hair growth and adds shine to your locks. By incorporating Vitamin E into your skincare and hair care routine, you can enjoy the benefits of healthier, glowing skin and luscious hair.

5 On-The-Go Beauty Tips for the Busy Professional

May 28, 2024 in Makeup Tips and Tricks

Quick and Easy Makeup Tips

When you’re short on time, focus on multi-purpose products. For example, a tinted moisturizer or a lip and cheek stain can save you time and space in your bag. Invest in a good makeup setting spray to keep your look fresh all day long. Consider using cream products as they are easy to blend and can be applied with your fingertips. Opt for a neutral eyeshadow palette that can create both day and night looks effortlessly. Don’t forget to groom your eyebrows as they can frame your face and give you a polished look in no time.

Woman in White Tank Top With Fresh Skin

Skincare Routine for Busy Professionals

Maintaining a skincare routine can be tough when you’re always on the go. However, with some simple adjustments, busy professionals can still achieve healthy skin. Here are five quick skincare tips to incorporate into your daily routine:

  1. Cleanse your face with a gentle cleanser in the morning and evening to remove dirt and impurities.
  2. Moisturize daily to keep your skin hydrated and prevent dryness.
  3. Apply sunscreen every morning to protect your skin from sun damage.
  4. Use multitasking products like a moisturizer with SPF to save time.
  5. Stay hydrated by drinking plenty of water throughout the day to keep your skin healthy and glowing.

Hairstyle Hacks for On-The-Go Beauty

For a quick hairstyle fix on busy days, try a high bun or a sleek ponytail. Dry shampoo can help refresh your hair and add volume in a pinch. Embrace braids for a stylish and easy look that holds up throughout the day. Hair accessories like headbands or hair clips can instantly elevate your style with minimal effort. Messy waves are a low-maintenance option that gives an effortless chic vibe to your hair.

Must-Have Beauty Products in Your Bag

Always have these essentials in your bag to freshen up your look anytime, anywhere. Here are the must-have beauty products for the on-the-go professional: mascara, lipstick, facial mist, blotting papers, and hand cream.

Time-Saving Beauty Tips for Busy Schedules

When you have a hectic schedule, time-saving beauty tips can be a game-changer. Here are some quick beauty hacks to help you look your best in no time: multi-purpose makeup products can save time and space in your bag, invest in dry shampoo to refresh your hair quickly, use tinted moisturizer for a quick and natural-looking coverage, opt for a bold lip color to add instant glamour, and keep makeup wipes handy for easy removal on the go. These tips can help you stay polished and put together even on the busiest of days.